Friday, February 26, 2010
The pain of XML in Web 2.0
I took the download sample I described here, and tried to visualize the data to Web 2.0 webpages. The data format of the XML of interest is:
First, I looked at the DOJO bar chart code and did something like this in a server side XQuery program that generated HTML with the following under JavaScript:
This works as XQuery can return sequence of primitive types and in this case, I'm just returning a string and inserting it inside of the JavaScript code that expects value/text values. But what if I want to have a REST endpoint serve up XML directly and have the browser consume it?
DOJO DataGrid can read from a DataStore which can be hooked to an XmlStore. This means I can use a browser side control to read from my server side XML. All seems good until you get into the details. Here are snippets of the code to make this "work":
What are the some of the issues with this? First, the XmlStore has to map to a simpler format for the DataGrid to understand the XML data. That is why I had to manually tell the XmlStore to promote all the attribute values to similarly named element names. Nicely, the XmlStore supports allowing the ability to drill down to something other than the root item for the data, but it really just allows you to pick the name of an element (you'll see I specified "month"). The second problem is that for any complex industry specific data, likely that wouldn't be sufficient. What if I had multiple month elements at different parts of the XML tree? I'd end up getting a table that combined months that meant different things. What I'd really want is XPath as the root selector. Third, even though the Store abstraction is nice for handling multiple data formats, if I wanted data to be combined from different parts of the XML tree or multiple trees, what I really would like is XPath from the DataGrid formatter function itself.
Assuming this might be easier in the other very popular library for JavaScript query, I went off an investigated jQuery. I quickly found articles that talked about jQuery and XML. I patterned the next part of the article after this example. So, rewriting, I ended up with:
Now, with jQuery, I'm actually able to do a little more "native" xml query. You'll see that I can access attributes directly. You'll see that I can navigate only to the months or the monthByMonthDownloadStats. However, as someone that knows XQuery, this syntax seems very unnatural (I'm sure it's very clear to JavaScript and/or CSS writers). Unnaturalness aside, this seems more verbose. In XQuery I can write this like:
With this I get all of the same benefits that jQuery has (plus more - I'm almost sure jQuery wouldn't support the rich Functions and Operations of XPath 2.0 or any mixed XML content common in document centric XML approaches). XQuery mixes the construction of the content with the query of input much better in my opinion (I believe if we showed date comparison for example you'd see a worse comparison). Of course the benefit of jQuery over XQuery is XQuery doesn't run in the browser. I had to run the previous XQuery sample on the server. That is a pretty big benefit.
I think the summary of all of this, if you stayed with me this long, is that Web 2.0 technology in the browser isn't really ready to handle the complex XML documents that exist within most enterprises. This means if you want to marry Web 2.0 with the enterprise XML data, you'll need to write data conversions essentially extending the presentation tier across the browser and middle tier that simplify the data or use feature like the Web 2.0 Feature Pack to do this for you. Also, you'll need to learn two languages (arguably three if you consider jQuery a language) and programming styles when dealing the with XML data.
Given I look at WebSphere XML Strategy, I'm not sure I'm happy with this answer. I am currently looking towards other solutions to this issue. Given I'm rather new to Web 2.0, feel free to point out other things I didn't consider in the Web 2.0 space for XML processing (outside of XForms of course).
Monday, February 22, 2010
XPath, XSLT 2.0 and XQuery 1.0 in five minutes
The thin client for the XML Feature Pack allows you to use the XPath 2.0, XSLT 2.0, and XQuery 1.0 runtime in your client applications of the application server using the same API's as when running in the application server. Before, you could get the thin client by installing the XML Feature Pack on top of the application server. Now, we've made the thin client separately downloadable which makes prototyping very simple.
Here are the links shown in the demo:
Direct link to download the thin client, Demo files
XML Feature Pack Thin Client Demo
Direct Link (HD Version)
Please note that the thin client is only supported on Java 1.6 JVM's.
Wednesday, February 17, 2010
Simple XQuery execution in Eclipse using XQDT/XML Feature Pack
After installing, here is how to setup the right things to make it call the XML Feature Pack:
1. Setup the interpreter to point to the XML Feature Pack thin client (note you can obtain the thin client from here for evaluation, or obtain it from a XML Feature Pack installation)
2. Create a new XQuery project
3. Setup the run as XQuery options to set the input file
4. Run and view the output
This will get you to a place where you can quickly edit and run XQuery programs. It won't allow you to debug and doesn't integrate with your Rational Application Developer projects, but for quick edit/run/fix development of XQuery it does a decent job. Its worth noting that this is something I discovered as working and given you get this from Eclipse/open source, there is no IBM support. However, if you give it a try and have some feedback, post it on the forum and I'll get it back to our tooling teams.
In the spirit of another big post, here are some images that show these steps, using the locations.xml and simple.xq that I used in this previous post.
To setup the interpreter to point to the XML Feature Pack thin client, load up Windows -> Preferences and navigate to XQuery -> Interpreters and click Add.
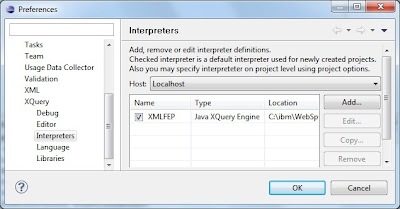
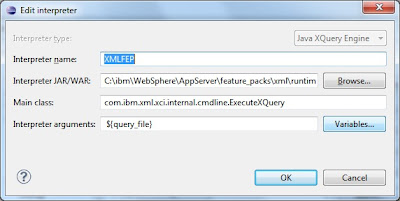
The settings to put into the dialog are:
Interpreter type:  Java XQuery Engine
Interpreter name:  XMLFEP
Interpreter JAR/WAR:  C:\ibm\WebSphere\AppServer\feature_packs\xml\runtimes\com.ibm.xml.thinclient_1.0.0.jar
Main class:  com.ibm.xml.xci.internal.cmdline.ExecuteXQuery
Interpreter arguments:   ${query_file}
And it looks like this:
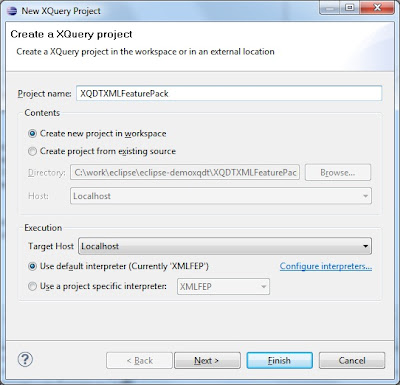
Next you need to create an XQuery project. It would be nice if you could use this functionality outside of an XQuery project, but I haven't been able to get that to work yet. You can create a new project by right clicking the project window New -> Other -> XQuery -> XQuery Project. Give it whatever name you want. Make sure you pick the XMLFEP (or whatever you named it) as the default interpreter. This looks like this:
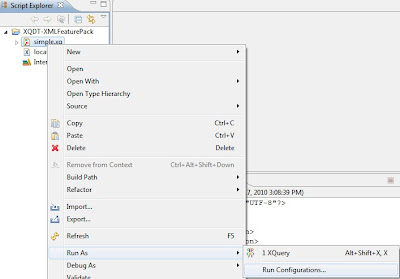
Next, copy the simple.xq and locations.xml into your project and refresh. Once you have done that you should be able to right click on simple.xq and do Run As->Run Configurations.... That looks like this:
Once you're in there, navigate to Arguments. You can add any command line options here, but most importantly you want to add the -input parameter and point it to the input file (locations.xml in this simple sample). That looks like this:
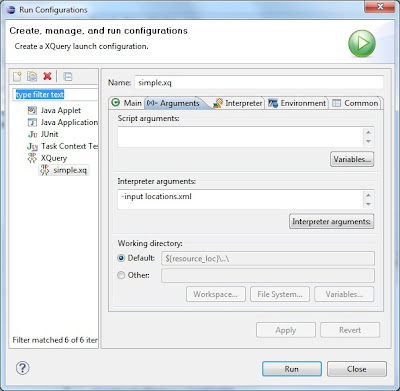
Once you have this setup, you can Run the XQuery file in the project by right click Run As->XQuery or simply Control-F11. If it all is setup right, you'll see the output in the console window. That should look like this:
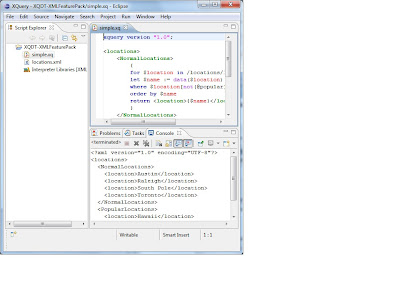
Update 2010-02-22: Note that if you have Java 1.5 on your path, make sure you replace it with Java 1.6. Otherwise you'll get an error about invalid class formats or magic numbers since the thin client only supports Java 1.6 JDK's. You can tell if your system have Java 1.5 on the path by opening a command prompt or shell and typing java -fullversion. Hopefully XQDT at some point will allow you to control what Java the execution is run on instead of defaulting to the global path version of Java.
Update 2010-10-06:
XQDT has moved to WTP Incubator at Eclipse. The XQDT team just release a new milestone, which in particular brings compatibility with the latest Eclipse Helios (Eclipse 3.6). For more details changes, go look at the New and Noteworthy page on the Eclipse web site:
http://wiki.eclipse.org/XQDT/New_and_Noteworthy/0.8.0
To install the latest XQDT build from Eclipse, make sure to stop using the old XQDT update site. Instead use the Eclipse update site:
http://download.eclipse.org/webtools/incubator/repository/xquery/milestones/
Friday, February 12, 2010
Try out WebSphere's OSGi Application Feature
I will refer to your WebSphere home directory as WAS_HOME throughout this post. I ran through this using the free-for-developers version of WebSphere running on Ubuntu, so there may be a slightly Linux-y flavour; I'll document the 'assume nothing' Ubuntu install here. Everything should, of course, work on any supported WAS platform.
The Blog sample
The Blog sample is an OSGi Application that demonstrates the main concepts and many of the benefits of assembling and deploying an enterprise application as an OSGi Application. It comprises four main bundles and an optional fifth bundle, the relationship between the bundles is shown below:
 The blog sample demonstrates the use of blueprint management, bean injection, using and publishing services from and to the osgi service registry, using optional services and the use of java persistence. In the main application, supplied as an EBA (enterprise bundle archive), the four bundles are:
- The API bundle - describes all of the interfaces in the application
- The Web bundle - contains all of the front end (servlet) code and the 'lipstick' (css, images)
- The Blog bundle - the main application logic. This bundle publishes a 'blogging service' that the Web bundles uses.
- The persistence bundle - the codes that deals with persisting objects (authors, blog posts ..) to a database (Derby in this case). The persistence bundle supplies a service for this which is used by the Blog bundle; the persistence service in this implementation uses JPA, with OpenJPA as the JPA provider.
- The final bundle is an upgrade to the persistence service, it contains an additional service that will deal with persisting comments as well as authors and blog posts.
Running the Blog Sample
The first steps in running the sample are to set up some data sources and create the database that the sample will use. There are instructions on how to do both in the Readme.txt file which can be found in WAS_HOME/feature_packs/aries/samples/blog; when you run the blogSampleInstall.py script use the 'setupOnly' option which will just create data sources. I'm going to step through the rest of the installation using the WebSphere Admin Console.
Start up WebSphere and point your web browser at the Admin Console, if you are running on a local machine and have not set up administrative security you will find the console at http://localhost:9060/ibm/console. Before going any further check that the data sources were set up properly by navigating to Resources->JDBC->Data sources, you should see something like this:

In the next sections I will work through installing the sample, starting with the bundles that it depends on.
Deploying bundles by reference
The Blog sample uses a common JSON library; while it could be deployed as part of the application the Blog sample illustrates how common libraries can be installed to the new WebSphere OSGi bundle repository and provisioned as part of the installation of an application that requires it. So the first thing we do is add the common JSON library to the WebSphere bundle respository. Navigate to Environment->OSGi Bundle Repositories->Internal bundle repository, the repository will be empty if you are using a new installation.
Click on 'New' to add a new bundle, on the next screen add the asset WAS_HOME/feature_packs/aries/InstallableApps/com.ibm.json.java_1.0.0.jar. Click 'OK' and then save the configuration, you should see this screen:

Creating the Blog Asset
Installing an OSGi Application through the Admin console is accomplished in two steps, described in this section. The blogSampleInstall.py script mentioned above illustrates the underlying wsadmin commands for a scripted install. The first step is to add an EBA (enterprise bundle archive) archive as an administrative asset, the .eba extension just indicates that this is an OSGi Application. Navigate to Applications->Application Types->Assets. Click 'Import' and add WAS_HOME/feature_packs/aries/InstallableApps/com.ibm.ws.eba.example.blog.eba. After saving you should see this:

Creating the Blog Sample Business Level Application
The second step is to to create an application which uses the EBA asset. Navigate to Applications->Business Level Applications, add a new application called Blog Sample:

After you have added the application you must associate it with the Blog sample asset, click on the sample and add com.ibm.ws.eba.examples.blog.eba under Deployed Assets.

As usual, save the configuration.
Start and run the Blog Sample application
At this point everything is in place and ready to run the application. From the Business Level Application screen, select the radio button beside the Blog sample and click start. If the sample starts as expected then point your web browser to
http://localhost:9080/blog, and you will see this:

With the blog sample running you will be able to add authors and posts and see that they are persisted to the database. Here is my first post to the Blog sample:

There isn't a great deal of functional code in this 1.0.0 version of the sample but a 1.1.0 version of the blog.persistence bundle is provided which adds a functional service to enable you to add comments to blog posts. We'll now illustrate how to update an application to add a new service by moving from version 1.0.0 of the blog persistence bundle to version 1.1.0 which contains the new service.
Changing the bundles that the Blog Sample application uses
First you will need to add the blog.persistence_1.1.0 jar to the internal bundle repository. This means repeating the same steps as for adding the JSON jar above. The path to the archive is WAS_HOME/feature_packs/aries/InstallableApps/com.ibm.ws.eba.example.blog.persistence_1.1.0.jar. Add it to the internal bundle repository and save the configuration.
Now you need to allow the application to use the new bundle. To do this, select the blog sample asset by navigating to Applications->Application types->Assets and clicking on com.ibm.ws.eba.examples.blog.eba. Scroll down to close to the end of the next screen where you will find this link:

Clicking on the 'Update bundle versions...' link will take you to this page:

Click on the the drop down arrow to the right of the line for the persistence bundle, you will be offered a choice of using the 1.0.0. or the 1.1.0 bundle. Choose 1.1.0 and follow through the preview and commit screens. You will need to restart the Blog application (from the Business Level Application screen) to make it use the new bundle, after that, navigating to http://localhost:9080/blog should show you the blog application with a new link to add comments. Unfortunately, it doesn't. This is what you will see:

This turns out to be entirely my mistake. In the last minute scramble to get the sample into the Beta delivery I didn't notice that some changes had been made to the JPA support had been made at the same time. The consequence of those changes is that my MANIFEST.MF requires an additional line. This is an easy fix and in the next section I'll describe how to make it.
How to modify the Blog Sample
All of the sample source code and Ant build files can be found under WAS_HOME/feature_packs/aries/samples/blog. Before making any other changes you should modify the build.properties file in this directory so that the first line refers to your WAS_HOME, you will need this file to build code with later on.
The best way to fix the problem with the MANIFEST.MF is to create another version of the persistence bundle, it should be a 1.1.1 version since the fix is very small. To start with, create a new directory under WAS_HOME/feature_packs/aries/samples/blog called com.ibm.ws.eba.example.blog.persistence_1.1.1, then copy the entire contents of com.ibm.ws.eba.example.blog.persistece_1.1.0 into it. Two files need to be modified, the META_INF/MANIFEST.MF needs to be changed to add the pink highlights shown below:

be very careful with the Meta-Persistence: line, it must have a space after the colon and the code will not compile if it doesn't. The second file that needs a small modification is the build.xml file, the project name needs to end 1.1.1, not 1.1.0.
After making the changes, run the build.xml file in your new 1.1.1 directory, like this:
ant -propertyfile ../build.properties -buildfile build.xml
This will create the archive target/lib/com.ibm.ws.eba/blog.persistence_1.1.1.jar. To install the new archive, go back to the WAS console and repeat the steps for adding it to the internal bundle repository and making the Blog Asset use it. Finally, restart the Blog application, point the web browser to the Blog and hit refresh. Et voila! A new link has appeared so that comments can be added to the post. Here is a screen shot with a comment added:

How does it work?
This Blog sample is designed to demonstrate how easy it is to change bundles and how to use optional services. To make this work we had to think about how to design the sample to be able to use the additional comment service from the start. This isn't really unrealistic, how often have you had a complete design in mind but not had time to implement the whole thing before delivering it? In this case we stopped short of delivering the service in the first version but we were able to supply it as an upgrade with an almost undetectable interruption to the service.
The sample is designed so that the bundles can be maintained completely independently of each other - I want the ability to upgrade one bit at a time. This might be overkill for an application of this size but the principle applies to applications of any complexity.
The other thing I have rather glossed over is that I didn't change the database, again the database had to have the right structure for the comment service from the start. However, this follows fairly naturally from designing the application to expect to be able to use commenting.
The best way to understand what is happening when the application is running is to look at the META-INF.MANIFEST.MF and OSGI-INF/blueprint/blueprint.xml files for each bundle. As the code is fairly simple, it's easy to follow through to the Java code and see where properties are injected by the container as specified in the application blueprint.
In the next revision of the Beta release I will fix the mistake in the MANIFEST.MF and will also correct a horrible anti-pattern that I introduced in trying to keep the persistence blog layers separate. In fact, I'll buy a beer for anyone that can see it and send me a good fix for it!
Monday, February 8, 2010
Some Learning Experiences with XQuery/XSLT2
First, DOJO is based upon JavaScript. When you write an XQuery that generates a dynamic web pages that mixes XQuery and DOJO, you need to be careful of the "{" character. JavaScript structures love to use the "{" character, as does XQuery. XQuery allows you to escape the "{" character by using "{{" (similarly for "}"). This isn't a huge issue once you realize what is going on as the XML Feature Pack will complain when compiling a XQuery + JavaScript program telling you that some XQuery script subsection isn't valid (its trying to interpret the JavaScript structure as XQuery).
Second, similar to a problem I had before, you have to be careful with namespaces. I had something like:
<html xmlns="http://www.w3.org/1999/xhtml" lang="en">
  <head>
    <title>Title</title>
  </head>
  <body>
{
   for $i in /some/path/in/input/document
   return $i
}
And the some path in input document wasn't returning any data, even though I knew there was data at that path. The issue here is documented in the spec. The default namespace of xhtml in the direct constructor becomes the default namespace for the path step elements. I found the simplest way to fix this was to move the path logic into a declared function that was outside of the direct constructor where the XHTML default namespace wasn't in scope. I could have also re-declared the default namespace or prefixed all xhtml nodes, but that wouldn't look as clean.
Speaking of declared functions, I also was tripped up for a little bit by the fact that declared functions don't get the same context passed to them automatically as the does the main execution of the same module. This exhibited by the runtime telling that the path I was executing was invalid as the context was unknown. Again the spec tells me that the context is undefined. In order to deal with this, you just need to pass the context of interest to the function and have all relative paths work off of the passed context.
Finally, I did get tripped up on XSLT 2.0 as well. When running a stylesheet that took no direct input, I mistakenly called setXSLTInitialMode (good for defining multiple paths through a XSLT 2.0 stylesheet) instead of setXSLTInitialTemplate (good for loading data from multiple input docs or unparsed text, etc.). Luckily, the errors of IXJXE0793E and ERR XTDE0045 came out in the logs and helped me spot the code completion generated typo.
Hopefully some small help if, like myself, you're working to use XQuery/XSLT 2.0 more and more in your ever day coding. Now, if I could just stop typing ";" at the end of XQuery let statements.
Friday, February 5, 2010
The appliance form factor of WebSphere CloudBurst
As with most new technologies, the WebSphere CloudBurst Appliance inspires a healthy set of questions. As usual most of the questions are about features, capabilities, use cases, etc., yet there is one question that is quite frequent but a bit of an outlier from the preceding categories. Personally, I’m not sure I’ve talked to a group about WebSphere CloudBurst without getting this question. What's the question?
“Why is WebSphere CloudBurst an appliance?”
It is a very fair question and one whose frequency used to surprise me. I guess I should have seen it coming because save the WebSphere DataPower Appliance, the brand isn’t typically associated with hardware.
In this particular case though, I can confidently say the appliance was exactly the right form factor for the offering, and it comes down to three main reasons:
1) Consumability
2) Capability
3) Security
In general, appliances deliver a very high level of consumability or put another way, decreased time to value. WebSphere CloudBurst fits this mold. When you receive the appliance you hook it up to your network, do some one time initialization and you are up and ready to go. The appliance comes loaded with pre-built and ready to use virtual images and patterns. You simply define your cloud infrastructure to WebSphere CloudBurst and you can start deploying the shipped patterns or you can begin to build and deploy your own. Since the function provided by WebSphere CloudBurst is delivered on the appliance’s firmware, there is no need to install and subsequently maintain software on other machines. In addition, any updates to this function are delivered via firmware updates that can be applied directly from the appliance’s console.
From a capability perspective, appliances deliver right-sized, purpose-built compute resources. In particular, the WebSphere CloudBurst Appliance contains the right amount of processing power, memory, storage, etc. to meet its needs. In many ways, this points back to consumability in that you don’t have to hunt down the right set of hardware and storage because all of that is delivered on the appliance. In addition, the delivery of function (firmware) and hardware in one unit allows for optimization otherwise hard to achieve.
Lastly, and possibly most importantly, the appliance form factor of WebSphere CloudBurst provides for a very high level of security. To start, all of the contents stored on the appliance, whether they exist on the hard drive or flash drive, are encrypted by a private key. This private key is unique to each and every appliance and it cannot be modified. The appliance provides no way to upload and execute code. There is no shell with which you can interface, and the internals operate on “Just Enough Operating System” principles to decrease the attack surface even further. Finally, the appliance is physically secure. If someone were to remove the casing in an attempt to access the internals, the box is put into a dormant state and must be sent back to IBM before it can be used again. This is in no way an exhaustive list of security features, but hopefully it gives you some background on the high degree of security provided via the appliance form factor.
I hope this helps shed some light on the decision to deliver WebSphere CloudBurst as an appliance. If you have other questions about WebSphere CloudBurst check out my top ten FAQs, or leave a comment below.